TOC
本文是RocketMQ源码分析系列的第三篇。在上一篇中,我们介绍了客户端的启动流程。无论是Producer还是Consumer,都是通过NameServer获取Broker的路由信息,然后连接到Broker上进行消息的发送和消费。本文将介绍RocketMQ的通信框架——基于Netty实现的RPC模块。阅读本文需要对Netty有一定的了解,我之前也写过Netty相关的系列文章,有兴趣的可以先去看看。而RocketMQ的RPC通信本质上是对Netty的封装,提供了更高层次的抽象。
通信框架核心类
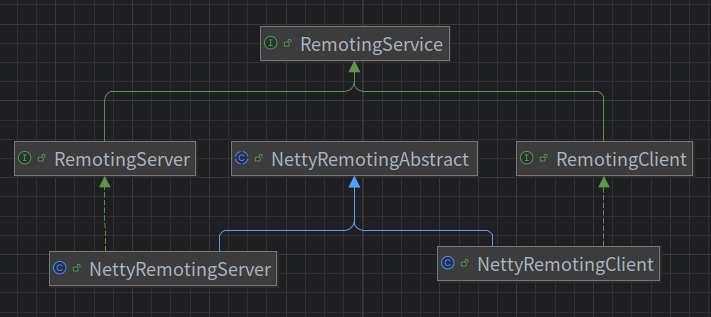
在RocketMQ中,对网络通信提供的核心抽象是下图所示的几个接口和类。从命名上,读者可以先猜一下各自的职责。
嗒嗒!谜底揭晓。
架构的核心是RemotingService/RemotingServer/RemotingClient三个接口和类,它们分别定义了抽象的服务、通信服务端和通信客户端的核心方法。具体来看,它们各自包含下面这些方法:
RemotingService(I)
 │ void start()
 │ void shutdown()
 │
 ├─ RemotingServer(I)
 │  │ void registerProcessor(reqCode, NettyRequestProcessor, ExecutorService)
 │  │ void registerDefaultProcessor(NettyRequestProcessor, ExecutorService)
 │  │ RemotingCommand invokeSync(Channel, RemotingCommand, timeoutMs)
 │  │ void invokeAsync(Channel, RemotingCommand, timeoutMs, callback)
 │  │ void invokeOneway(Channel, RemotingCommand, timeoutMs)
 │
 ├─RemotingClient(I)
    │ void registerProcessor(reqCode, NettyRequestProcessor, ExecutorService)
    │ void updateNameServerAddressList(List<String>)
    │ RemotingCommand invokeSync(String, RemotingCommand, timeoutMs)
    │ void invokeAsync(String, RemotingCommand, timeoutMs, callback)
    │ void invokeOneway(String, RemotingCommand, timeoutMs)
    │ void setCallbackExecutor(ExecutorService)
核心类的核心逻辑
这里有几个问题:
-
Q1:
registerProcessor方法自然是注册Netty回调处理器的。基于给定的请求码(requestCode)和处理器(NettyRequestProcessor),将其注册到服务端或客户端中。但是为什么RemotingServer比RemotingClient多了一个registerDefaultProcessor方法?这个方法的作用是什么? -
A1:注册服务时需要指定处理线程池(ExecutorService),将部分核心命令(如发送消息、接收消息、维持心跳等)注册到特定的线程池中进行处理,避免互相影响。而
registerDefaultProcessor是将一些通用的处理器注册到一个大杂烩线程池中,通常是一些优先级比较低的请求(如创建Topic、创建Group等)。这些偏管理向的操作主要还是在Server端,Client则没有这样的需求,所以没有registerDefaultProcessor方法。 -
Q2:注意
invokeSync/invokeAsync/invokeOneway三个方法在RemotingServer和RemotingClient中都有定义,但是它们的第一个参数有差异:分别是Channel和String,这意味着什么? -
A2:在RemotingServer中,
invokeSync/invokeAsync/invokeOneway的第一个参数是Channel,表示已经建立好的网络连接(通常是客户端到服务端的连接)。而在RemotingClient中,第一个参数是String addr,表示目标服务器的地址。客户端需要根据地址建立连接后再发送请求,而服务端已经有了与客户端的连接通道。两者的参数差异反映了各自的角色和调用场景。
接下来是NettyRemotingAbstract这个抽象类,提供了一些通用的Netty/网络相关方法。它包含以下几个重要的成员变量和方法:
NettyRemotingAbstract(A)
 │ responseTable: ConcurrentMap<Integer/*opaque*/, ResponseFuture>
 │ processorTable: HashMap<Integer/*reqCode*/, Pair<NettyRequestProcessor, ExecutorService>>
 │ void processMessageReceived(ChannelHandlerContext, RemotingCommand)
 │ void processRequestCommand(ChannelHandlerContext, RemotingCommand)
 │ void processResponseCommand(ChannelHandlerContext, RemotingCommand)
 │ void invokeSyncImpl(Channel, RemotingCommand, timeoutMs)
 │ void invokeAsyncImpl(Channel, RemotingCommand, timeoutMs, InvokeCallback)
 │ void invokeOnewayImpl(Channel, RemotingCommand, timeoutMs)
更具体地,服务端启动流程为:
- 使用
NettyServerConfig配置作为参数创建NettyRemotingServer实例 - 在
NettyRemotingServer实例中注册请求处理器(NettyRequestProcessor)并指定对应的请求码(requestCode) - 调用
.start()方法启动server
客户端发送请求的流程:
- 使用
NettyClientConfig配置作为参数创建NettyRemotingClient实例 - 调用
.start()方法启动client - 构建请求实体
RemotingCommand并指定请求码(requestCode) - 调用invokeSync(或者其他请求方法)发送请求(RemotingCommand)并获取响应(也是一个RemotingCommand)
下面是源码中的一个单元测试,演示如何基于上述框架完成一个最简单的通信流程:
// @see org.apache.rocketmq.remoting.RemotingServerTest

/* Server Side */
NettyServerConfig config = new NettyServerConfig();
RemotingServer remotingServer = new NettyRemotingServer(config);
remotingServer.registerProcessor(0, new AsyncNettyRequestProcessor() {
 @Override
 public RemotingCommand processRequest(ChannelHandlerContext ctx, RemotingCommand request) {
  request.setRemark("Hi " + ctx.channel().remoteAddress());
  return request;
 }

 @Override
 public boolean rejectRequest() {
  return false;
 }
}, Executors.newCachedThreadPool());

remotingServer.start();

/* Client Side */
RemotingClient client = new NettyRemotingClient(nettyClientConfig);
client.start();
RemotingCommand request = RemotingCommand.createRequestCommand(0, requestHeader);
RemotingCommand response = remotingClient.invokeSync("localhost:8888", request, 1000 * 3);
深入RocketMQ+Netty定制逻辑
这里带来几个疑问:
- RocketMQ具体对Netty进行了怎样的封装(自定义)?更细化的处理流程是怎样的?
- 请求体RemotingCommand的完整结构是怎样的?正式的请求(比如发送消息)的结构是如何基于此结构来定义的?
很显然,服务端是在NettyRemotingServer中引入了对Netty的依赖,通过Netty的启动工具类ServerBootstrap()来创建一个服务端实例。比较重要的实例化步骤包括:
- 创建Boss线程池,负责接收和处理Netty的连接请求
- 创建Worker线程池,负责接收和处理Netty业务请求
- 创建若干Handler实例,负责实现业务逻辑
- 构造Netty的处理流程pipeline
其中,构造pipeline的代码如下:
// @see org.apache.rocketmq.remoting.netty.NettyRemotingServer.start()

ServerBootstrap childHandler =
	this.serverBootstrap.group(this.eventLoopGroupBoss, this.eventLoopGroupSelector) // 传入 boss 和 worker 线程池
		.channel(useEpoll() ? EpollServerSocketChannel.class : NioServerSocketChannel.class) // 指定使用 epoll 或 nio 方式创建 channel
		// TCP 相关的配置项
		.option(ChannelOption.SO_BACKLOG, nettyServerConfig.getServerSocketBacklog())
		.option(ChannelOption.SO_REUSEADDR, true)
		.option(ChannelOption.SO_KEEPALIVE, false)
		.childOption(ChannelOption.TCP_NODELAY, true)
		.localAddress(new InetSocketAddress(this.nettyServerConfig.getListenPort())) // 绑定 TCP 端口
		// 定义 pipeline
		.childHandler(new ChannelInitializer<SocketChannel>() {
			@Override
			public void initChannel(SocketChannel ch) throws Exception {
			    // 请求进来之后,依次执行下面的 handler 回调方法做业务逻辑
				ch.pipeline()
				    // SSL 开启时需要在此 handler 处理握手,本次分析忽略 SSL
					.addLast(defaultEventExecutorGroup, HANDSHAKE_HANDLER_NAME, handshakeHandler)
					// 将业务 handler 注册到 pipeline,执行的顺序是先 addLast 的先执行
					.addLast(defaultEventExecutorGroup,
						encoder,
						new NettyDecoder(),
						new IdleStateHandler(0, 0, nettyServerConfig.getServerChannelMaxIdleTimeSeconds()),
						connectionManageHandler,
						serverHandler
					);
			}
		});
更多Netty的细节可以参看Netty介绍
注意到注册到pipeline的业务handler一共有5个:
- NettyEncoder:继承自OutboundHandler,请求出栈时将
RemotingCommand编码为ByteBuf - NettyDecoder:继承自InboundHandler,请求入栈时将
ByteBuf解码为RemotingCommand对象 - IdleStateHandler:继承自ChannelDuplexHandler,当Channel超时无请求时发送一个
IdleStateEvent事件,由下面的NettyConnectManageHandler捕捉并断开该Channel - NettyConnectManageHandler:监听Channel状态事件,并回调
channelEventListener(如果有注册的话) - NettyServerHandler:继承自ChannelInboundHandler,对接收到的
RemotingCommand进行业务处理
下面看看核心业务的NettyServerHandler在接收到请求RemotingCommand之后的处理逻辑:
NettyServerHandler#channelRead0(ChannelHandlerContext, RemotingCommand)
  ├─ NettyRemotingAbstract#processMessageReceived(ChannelHandlerContext, RemotingCommand)
    | if(cmd.getType()==REQUEST) processRequestCommand(ctx, cmd)
    | if(cmd.getType()==RESPONSE) processResponseCommand(ctx, cmd)
以type=REQUEST的请求为例,会找到该请求的reqCode对应的处理器(Processor)和线程池,将逻辑封装成Runnable提交到该线程池进行处理。具体代码如下:
// @see o.a.r.r.netty.NettyRemotingAbstract#processRequestCommand

// processorTable注册了每个reqCode对应的处理器, 注意每个处理器还对应了负责执行它的线程池
final Pair<NettyRequestProcessor, ExecutorService> matched = this.processorTable.get(cmd.getCode());
// 若没有匹配的处理器,则使用default
final Pair<NettyRequestProcessor, ExecutorService> pair = null == matched ? this.defaultRequestProcessor : matched;
// opaque用于记录on-going请求,一般是自增的唯一数字标示
final int opaque = cmd.getOpaque();

if (pair != null) {
  Runnable run = new Runnable() {
    @Override
    public void run() {
      try {
        String remoteAddr = RemotingHelper.parseChannelRemoteAddr(ctx.channel());
        doBeforeRpcHooks(remoteAddr, cmd);
        // 回调函数, 用于将返回体通过netty返回请求方
        final RemotingResponseCallback callback = new RemotingResponseCallback() {
          @Override
          public void callback(RemotingCommand response) {
            doAfterRpcHooks(remoteAddr, cmd, response);
            if (!cmd.isOnewayRPC()) {
              if (response != null) {
                response.setOpaque(opaque);
                response.markResponseType();
                try {
                  // 刷回netty
                  ctx.writeAndFlush(response);
                } catch (Throwable e) {
                  // 异常处理
                }
              } else {// oneway请求, 不需要响应
              }
            }
          }
        };
        if (pair.getObject1() instanceof AsyncNettyRequestProcessor) {
          // 异步执行, 在回调方法中调用callback
          AsyncNettyRequestProcessor processor = (AsyncNettyRequestProcessor)pair.getObject1();
          processor.asyncProcessRequest(ctx, cmd, callback);
        } else {
          // 同步执行, 在当前线程(Processor注册的线程池)中执行请求处理, 并回调callback
          NettyRequestProcessor processor = pair.getObject1();
          RemotingCommand response = processor.processRequest(ctx, cmd);
          callback.callback(response);
        }
      } catch (Throwable e) {
        // 异常处理
      }
    }
  };

  if (pair.getObject1().rejectRequest()) {
    // 对应processor处于繁忙状态, 快速返回SYSTEM_BUSY, 跳过后续逻辑
    return;
  }

  try {
    // 将处理逻辑提交到processor的线程池中执行
    final RequestTask requestTask = new RequestTask(run, ctx.channel(), cmd);
    pair.getObject2().submit(requestTask);
  } catch (RejectedExecutionException e) {
    // 异常处理
  }
} else {
  // 无对应processor的异常处理
}
至此,通信框架的介绍完毕。不同的请求有不同的Processor实现,后续文章会继续分析其内部实现。
RemotingCommand的数据包结构
再来看看RemotingCommand的结构,以及如何对其进行序列化。
public class RemotingCommand {
  // 请求码,依赖此标识请求类型
  private int code;
  // 这些参数在发送时会根据序列化方法整合到header中, 具体见RemotingCommand#headerEncode
  private LanguageCode language = LanguageCode.JAVA;
  private int version = 0;
  private int opaque = requestId.getAndIncrement();
  private int flag = 0;
  private String remark;
  private transient CommandCustomHeader customHeader;
  private HashMap<String, String> extFields;
  private SerializeType serializeTypeCurrentRPC = serializeTypeConfigInThisServer;
  // 请求体, 可以为空
  private transient byte[] body;
}
下面是一个示例请求包的结构:

值得注意的是,请求的自定义参数在发送时会封装到一个extFields的Map容器中,发送时通过JSON或RocketMQ自定义的序列化方式转化成encode(header)字节流发送出去。
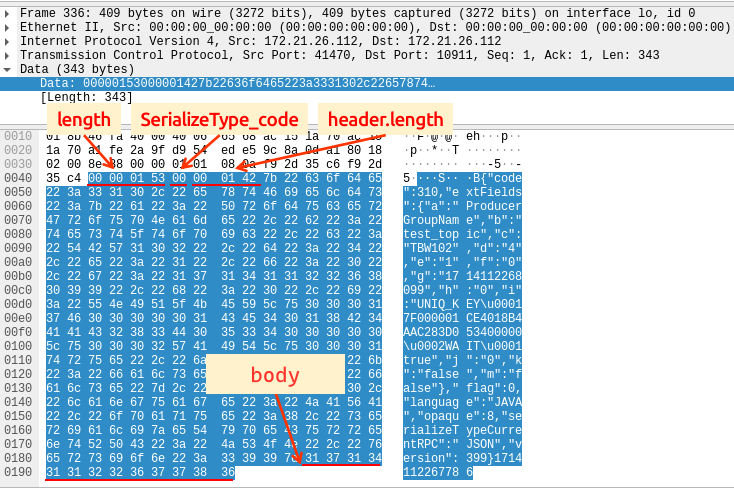
最后补充一个发送消息的抓包快照:
- 第一部分: 0x00000153对应十进制是339,表示整个请求包长度为339
- 第二部分:0x00对应十进制是0,表示header采用JSON的方式进行序列化
- 第三部分:0x000142对应十进制是322,表示header部分的长度是322
- 第四部分:是对header进行JSON序列化的内容
- 第五部分:是请求body,这里发送的是一个时间戳文本
以上完成了对RocketMQ通信框架的介绍,简单总结一下:
- RocketMQ基于Netty封装了自己的一套通信协议,数据包处理的流程是流式的(pipeline),解包得到特定的请求后由对应的注册回调方法进行处理
- 无论是客户端还是服务端,都支持sync/async/oneway三种请求方式
- 数据包结构比较简单,只有五部分:总长度+编码标识+header长度+header内容+body内容