TOC
前Future时代
在java多线程开发中,最简单的实现方案是直接创建一个Thread对象,通过Thread.start()方法启动一个线程执行异步任务。像下面这样的一段代码你应该非常熟悉。
new Thread(new Runnable() {
    @Override
    public void run() {
        // do something
    }
}).start();
但是这样创建的子线程任务有非常大的局限性,首当其冲就是子线程无法跟父线程通信。比如父线程需要等待子线程结束后才结束这样的场景。你可能会想出共享变量的方式来实现线程通信,像下面这样的代码你肯定写过:
final AtomicBoolean subThreadFinished = new AtomicBoolean(false);
new Thread(new Runnable() {
    @Override
    public void run() {
        //do something
        subThreadFinished.set(true);
    }
}).start();
while (!subThreadFinished.get()) {
    Thread.sleep(100); // 轮询子线程结束信号
}
只是这种土方法的局限性也很强,首先是无法精确实现线程控制。上面这个例子,如果一次轮询之后子线程刚好退出,父线程需要100毫秒之后才能通过共享变量得知,这就会出现时差。当然可以通过减少休眠时间来减少延迟,但一方面只要有sleep延迟就无法完全消除,另外太频繁的轮询也会增加不必要的性能消耗。有什么办法来实现优雅的线程间通信?有,那就是今天要介绍的Future + Callable。
Future+Callable
Future是jdk1.5通过juc包引入的一个接口,它代表一个异步操作的结果,定义了获取结果/取消执行/判断执行状态 相关的一些方法:
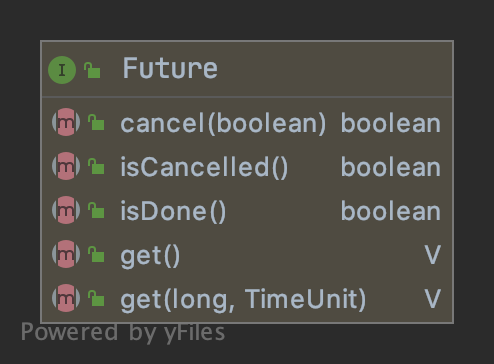
Future是一个非常有意思的概念抽象,在javadoc是这样定义这个接口的:
java.util.concurrent.Future包的JavaDoc文档
A Future represents the result of an asynchronous computation. Methods are provided to check if the computation is complete, to wait for its completion, and to retrieve the result of the computation. The result can only be retrieved using method get when the computation has completed, blocking if necessary until it is ready. Cancellation is performed by the cancel method. Additional methods are provided to determine if the task completed normally or was cancelled. Once a computation has completed, the computation cannot be cancelled. If you would like to use a Future for the sake of cancellability but not provide a usable result, you can declare types of the form Future and return null as a result of the underlying task.
“Future表示的是一个异步操作的结果”,而真实的结果可以通过get()方法来异步获取。那么可以总结出Future的使用模式是这样的:
// (A线程)先定义结果
Future future = new Future();

// (A线程)等待结果运行, 这个过程是跟下面的get()方法并行
// (B线程)处理并写入结果

// (A线程)尝试获取get()结果,或者get(long, TimeUnit)带超时地等待结果
Object result = future.get();
基于Future接口,juc实现了一个FutureTask,它继承了Runnable接口,可作为Thread对象的构造参数——即意味着它能在异步线程中执行。使用FutureTask实现前述例子可以这样:
FutureTask<Integer> future = new FutureTask<>(new Callable<Integer>() {
    @Override
    public Integer call() throws Exception {
        return null; // 这里并不需要通过callable返回任何数据
    }
});

new Thread(future).start();
Integer result = future.get(); // 阻塞等待
在这个例子中Future通过一个阻塞方法get()实现了前文土方法轮询子线程完成消息通信的工作。这和直接通过主线程sleep() + get()的实现方式有明显的不同:
- 不需要间隔等待,唤醒时间更快
土方法 VS. Future 区别源于实现思路,土方法让主线程主动去拉取。而Future是由消息生产线程通知主线程——你现在可以来拉消息了。因此省了频繁轮训,而且也更及时(不等待完整一个轮训走完即可拉取)。
这个get方法是怎样做到的?下面是它的实现:
// FutureTask.java
public V get() throws InterruptedException, ExecutionException {
    int s = state; // 当前状态
    if (s <= COMPLETING)
        s = awaitDone(false, 0L); // 交出cpu时间,进入线程睡眠,效率比密集的while轮询高
    return report(s);
}
答案看上去似乎很简单,通过FutureTask定义的一个实例变量state来判断当前FutureTask的状态,结合FutureTask实现的Future接口的定义,state也就是异步执行的结果的状态。state有以下几种状态:
| state | value | 说明 |
|---|---|---|
| NEW | 0 | 初始状态 |
| COMPLETING | 1 | 线程结束,但子线程结果未写入outcome变量 |
| NORMAL | 2 | 线程正常结束,且子线程结果已经写入outcome变量 |
| EXCEPTIONAL | 3 | 线程异常 |
| CANCELLED | 4 | 线程通过cancel结束 |
| INTERRUPTING | 5 | 线程中断的中间状态 |
| INTERRUPTTED | 6 | 线程中断 |
在FutureTask刚启动的时候,state初始为状态NEW。在get()方法中判断如果线程尚未停止,则通过awaitDone()进行阻塞等待。进入此方法之前,我们先看看后面的report(s)方法,它在子线程结束之后调用,用于给当前线程返回get()需要的结果。
// FutureTask.java
private V report(int s) throws ExecutionException {
    Object x = outcome; // 子线程结果
    if (s == NORMAL)
        return (V)x; // 泛型转换
    if (s >= CANCELLED)
        throw new CancellationException();
    throw new ExecutionException((Throwable)x);
}
FutureTask竟然也是通过共享变量outcome来实现线程间通信的!本质上跟前文我们自己基于Future接口实现的RollingDiceFuture并无本质区别。
线程间通信的Plan B?
除了共享变量的方法实现线程通信,还有基于消息队列的模型,比如golang的channel,或者AKKA框架。
那么既然都是通过共享变量的方式实现通信,FutureTask比我们自己实现的土方法有什么优势呢?回答这个问题,让我们回到get()方法调用的awaitDone()阻塞等待方法。
// FutureTask.java
private int awaitDone(boolean timed, long nanos)
        throws InterruptedException {
    final long deadline = timed ? System.nanoTime() + nanos : 0L;
    FutureTask.WaitNode q = null;
    boolean queued = false;
    for (;;) {
        if (Thread.interrupted()) {
            removeWaiter(q);
            throw new InterruptedException();
        }

        int s = state;
        if (s > COMPLETING) { // 线程已经结束, 或普通结束,或异常退出,或被cancel
            if (q != null)
                q.thread = null;
            return s;
        }
        else if (s == COMPLETING) // 线程结束,但子线程结果未写入outcome变量
            Thread.yield();
        else if (q == null) // 等待Future完成的队列为空,先创建单节点队列.
            q = new FutureTask.WaitNode();
        else if (!queued) // 通过CAS将代表当前线程的等待节点加入FutureTask的全局等待队列
            // 成功则queued=true,失败则下次循环重试加入队列
            queued = UNSAFE.compareAndSwapObject(this, waitersOffset,
                    q.next = waiters, q);
        else if (timed) {
            nanos = deadline - System.nanoTime();
            if (nanos <= 0L) {
                // 在当前线程park之前到达超时时间,直接退出
                removeWaiter(q);
                return state;
            }
            // 未超时, 则进行带时限的park操作,线程进入等待
            LockSupport.parkNanos(this, nanos);
        }
        else // 无超时地park,线程进入等待
            LockSupport.park(this);
    }
}
awaitDone的入参接受两个参数,用于控制超时等待,若timed=false,则无限等待子线程。方法的核心是一个死循环,循环的过程中会判断线程是否被当前线程是否中断,用于响应当前线程的中断信号。而真正的关键是紧接着中断判断后面的代码。一共有6个if-else判断分支:
- s > COMPLETING, 此时子线程已经结束,返回对应的结束状态即可。
- s == COMPLETING, 此时子线程已经结束,但是还在处理outcome赋值操作,预计操作时间比较短,通过yield短暂交出cpu时间片,在下一次循环中可能就满足s>COMPLETING退出循环。
- 以下几个if分支均在s为NEW,子线程尚未结束的情况下进入。第3、4个if分支用于构造WaitNode,这是FutureTask的内部类,用于保存等待同一个FutureTask的多个线程实例的链表结构。并通过CAS更新来实现并发安全。将多个等待线程以链表的方式保存起来,可以合理猜测其后续将以链式触发的方式唤醒这些线程。
- 最后两个if分支则是针对超时/无限等待的两种情况分别通过LockSupport.park()挂起线程。
如果一次循环内判断子线程仍在运行,导致当前线程挂起,由谁在什么时候唤醒当前线程呢?
由于当前线程通过LockSupport.park()挂起,正常的情况肯定是通过LockSupport.unpark(Thread)进行唤醒,所以在FutureTask.java内搜索unpark方法的调用,会发现只有一处,就在finishCompletion(),逻辑比较清晰,就是遍历前面提到的等待线程构成的链表waiters,挨个唤醒等待线程。
private void finishCompletion() {
    for (FutureTask.WaitNode q; (q = waiters) != null;) {
        if (UNSAFE.compareAndSwapObject(this, waitersOffset, q, null)) { // CAS重置等待线程链表为空,防止并发竞争
            for (;;) {
                Thread t = q.thread;
                if (t != null) {
                    q.thread = null;
                    LockSupport.unpark(t);
                }
                FutureTask.WaitNode next = q.next;
                if (next == null)
                    break;
                q.next = null; // unlink to help gc
                q = next;
            }
            break;
        }
    }

    done(); //done方法处理 FutureTask结束后的剩余工作,默认实现为空方法,由子类按需实现

    callable = null;        // to reduce footprint
}
而finishCompletion()由谁调用?共三个地方,分别对应子线程三种结束的方式:
FutureTask#cancel()当前线程主动停止FutureTask#set(V v)子线程正常结束回调此方法,将结果写入outcome变量FutureTask#setException(Throwable t)子线程异常结束回调此方法,将异常写入outcome变量
至于子线程如何回调?这就回到最原初的Runnable接口的run方法,由于FutureTask继承了Runnable方法,所以在FutureTask中由对应的run()方法的实现,线程启动后,run()方法则在子线程中执行。不难想像,在FutureTask#run方法中会调用构造FutureTask时传入的Callable对象的call()方法,后者实现了真正需要在子线程中做的业务逻辑。
public void run() {
    if (state != NEW ||
            !UNSAFE.compareAndSwapObject(this, runnerOffset,
                    null, Thread.currentThread()))
        return;
    try {
        Callable<V> c = callable;
        if (c != null && state == NEW) {
            V result;
            boolean ran;
            try {
                result = c.call();
                ran = true;
            } catch (Throwable ex) {
                result = null;
                ran = false;
                setException(ex);
            }
            if (ran)
                set(result);
        }
    } finally {
        // runner must be non-null until state is settled to
        // prevent concurrent calls to run()
        runner = null;
        // state must be re-read after nulling runner to prevent
        // leaked interrupts
        int s = state;
        if (s >= INTERRUPTING)
            handlePossibleCancellationInterrupt(s);
    }
}
总结
至此,Future/FutureTask/Callable的实现原理介绍完毕。总结一下。
FutureTask实现线程间通信的方法跟你常用的共享变量土方法无本质区别。但是FutureTask通过LockSupport.park/unpark+ 等待线程队列 的方法实现由子线程主动唤醒父线程(等待线程),避免父线程循环判断子线程状态,从而实现了更高的性能。
当然你也要知道,在出现多个等待线程并发操作同一个FutureTask对象时,为了实现并发安全,FutureTask使用了CAS技术保证操作的原子性。